The Double Arm meets the DSLR
A couple of years ago I purchased a nice Digital Single Lens Reflex (DSLR) camera. I purchased a Canon EOS Digital Rebel T1i with the standard lens (18-55mm). It was bundled with an additional lens (55-250mm). This is a wonderful camera! I bought this outfit for the usual kinds of reasons; to take pictures of my family and my rose garden.
But I used to be into Astrophotography, back in the bad old days of film; slow, slow film. Astrophotography used to be very tedious, difficult and expensive. I was aware that the DLSR has changed all that. It’s now much easier and in some ways much more simple.
Like many people, I wanted to do some simple astrophotography with the equipment I had just purchased. I didn’t want to spend a lot of money on special add-ons, at least not to start with. I just wanted to try it out a little and see how things have changed since the days of film.
- Could I do astrophotography with my camera as it was, right out of the box?
- Did I have to spend a fortune on additional equipment?
- I still had my old Double Arm Barn Door Mount. Was that helpful anymore or had it been relegated to the same trash can as the old film SLR?
Here are the results of my experiments:
With a little investment of time and a few dollars, I found that I could produce some very nice pictures. No telescope was necessary. No dome. No trips to the top of a mountain. I could do astrophotography right in my back yard. It was easy and cheap. Before I started all this I did some reading online. There are several great webpages. I highly recommend Covington and Lodriguss. I made all these shots from my backyard in the suburbs of Denver.
I already had a good tripod. This was very important because I needed to take long exposures. I found that the internal timer on my camera was just great for the task and I set it to delay the shutter for about ten seconds and open it for up to 30 seconds so I was not touching the camera which would introduce shake and maybe ruin the images. I could also have used my laptop if I had wanted to haul it out to the back yard. The camera comes with a USB wire and you can control the entire thing from the computer. Later I earned that you can really get great focus on your images by using the computer to monitor and magnify a live image. The software comes with the camera. Easy!
I turned off the autofocus and image stabilization on my lenses. I shot both of them in various configurations. Sometimes I used the mirror lock-up feature but after a few shots I found that it was unnecessary. It’s really cool that you can do little experiments like this with a DSLR and get immediate feedback by checking your images right in the camera. You can magnify the shots and see them very well. Or you can also put them on your computer right away and see what you have.
I turned on the long exposure compensation. This made the shots take twice as long as the exposure as the camera did some magical digital corrections to the image but I think it was worth it. Frankly, I never bothered trying without it. I did not want to mess around with a lot of post processing or anything like that to start with. I was not shooting a lot of long exposures anyway. There is a way around this situation by shooting Dark Frames and stacking them in the computer but I did not want to get into that just yet. I was trying to keep it simple as I was starting out.
To focus I used the regular view finder on a bright star to get the star as bright and small as possible. Then I turned on the live focus mode. With a little tweaking and using the magnify button, I was able to focus on a bright star. I had to focus manually because the auto-focus is not designed for such an unusual shot. This was easy with the 28-55 but got pretty tricky with the telephoto at 250mm. You have to have a stable mount and non-shaky fingers! But after a few tries I was able to get it as sharp as it could be. Though I used the live focus feature on the camera body itself, I later learned that it is much easier to do this using a laptop hooked to the computer. The tricky part is that any little shake of your hand causes the image to move all over the screen. It takes a very delicate touch and some patience, especially at the longer focal length. I did not touch the lens after that! I just popped out several shots with it at that setting. It’s important not to nudge the lens at all after you have it set properly. How cool is that?
I saved the images as both RAW and .jpg and did some modest tweaking on the RAW images after downloading the shots to my computer. I used the software that came with the camera for adjusting the images and did not put much effort into the processing. I just fiddled with them for few minutes using the software right out of the box. This was fun and I could see how you might get addicted to this. I used to do a lot of darkroom work printing my film shots and this is much faster, simpler and less smelly. The shots you see are pretty much as they were, with a little contrast added and brightness reduced to make the sky darker. This was very easy with the supplied software.
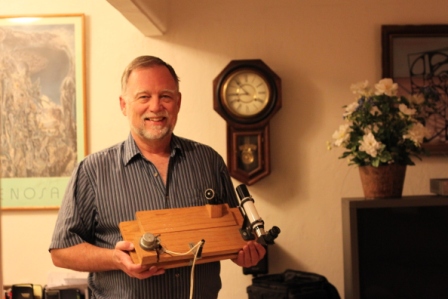
I used the original Double Arm Barn Door I made back in the 1980’s. Here is a recent picture.
For comparison purposes, I made shots with the drive on and with it off. I just left the camera exactly where it was on the mount and unplugged the motor. Here it is all set up to take pictures.
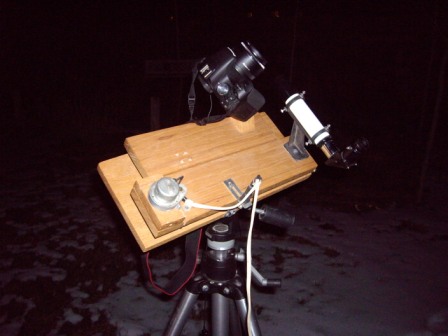
I did not use the polar alignment scope attached in the photos. I just sighted Polaris between the boards and did my best to make sure the hinge was aimed straight at it. I used the lens that came with the camera and the additional telephoto that I got as part of the special package. No special filters, adapters or anything else. Here are a couple of shots of the southern part of Orion featuring the Orion Nebula (M42). Both of these are 30 second shots using a 250mm lens were taken with a at f5.6, ISO1600. It is obvious which one has the double arm tracking switched on.
![]()
![]()
Conclusions:
Sure enough tracking is necessary for these focal lengths. The star trails in the non-tracking photo are pretty but you cannot make out the Orion Nebula very easily.
Did I need the Double Arm Barn Door mount?
Probably not. A Single Arm Barn Door mount would have done just fine for these shots. You can build a Single Arm Barn Door mount for a few dollars. The tracking requirements for a 30 second shot are very easy and even a Single Arm Barn Door can do this if it is near the fully closed position. There was really no need for two arms, cams or special electronics. As long as the shots were as short as this, even 30 seconds with a 250mm telephoto lens, everything would have been just fine with an ordinary Single Arm Barn Door mount.
So why did I use the Double Arm? Because I already had a very nice little Double Arm Mount. It was just gathering dust in my cabinet, so I used it. In the old days the advantage of the Double Arm Drive was that you could shoot the long exposures, maybe 15 minutes or more, that were necessary in the days of film. But these shots were only 30 seconds long so, there was no need for the Double Arm precision.
Maybe not, but it sure was handy. The beauty of the Double Arm Barn Door mount (or any of the cam or curved bolt drives) was that I could just plop the camera on the mount, focus the lens carefully and pop off many exposures, one after another. I didn’t have to rewind the mount to avoid tangent error. So, I had good tracking for at least half an hour without rewinding. I did not have to worry about that! It was easy and sweet. I shot pictures to my heart’s content and worried about framing the shot and getting that ever-so-delicate focus. That kept me busy enough. No time for rewinding and reframing. The mount was just quietly purring away, producing all the tracking I needed. Sweet!
ADVICE
If you want to try this out yourself you can build a simple Single Arm Barn Door that can produce similar images. See the links at the bottom. Hand turning the crank will work if you are very careful, especially if you have a nice robust tripod. Heck, with a DSLR you can just throw away the shots you botch because you didn’t turn the crank at the proper speed or you accidentally touched the lens and messed up the focus. But, you will need to reset the barn door back to zero after a couple of shots or the tangent errors will start to ruin your shots. This option will cost you very little: an hour or two in the garage tinkering and a few bucks at the hardware store. The major cost will be the ball-head camera mount, but you can make one of those too!
If you want a little more convenience and fewer hassles then you may want to build a Double Arm Barn Door. That way you won’t have to rewind so frequently. It’s really not much more complicated or expensive to build a Double Arm Barn Door: another hinge and a couple of pieces of plastic for the contact point. For added convenience, if you are handy enough, build a motorized Double Arm Barn Door. See the LINKS below for plans.
Either way, you don’t need to buy a fancy telescope to try out astrophotography. It’s easy, fun and inexpensive if you already have the DSLR.
Conclusion
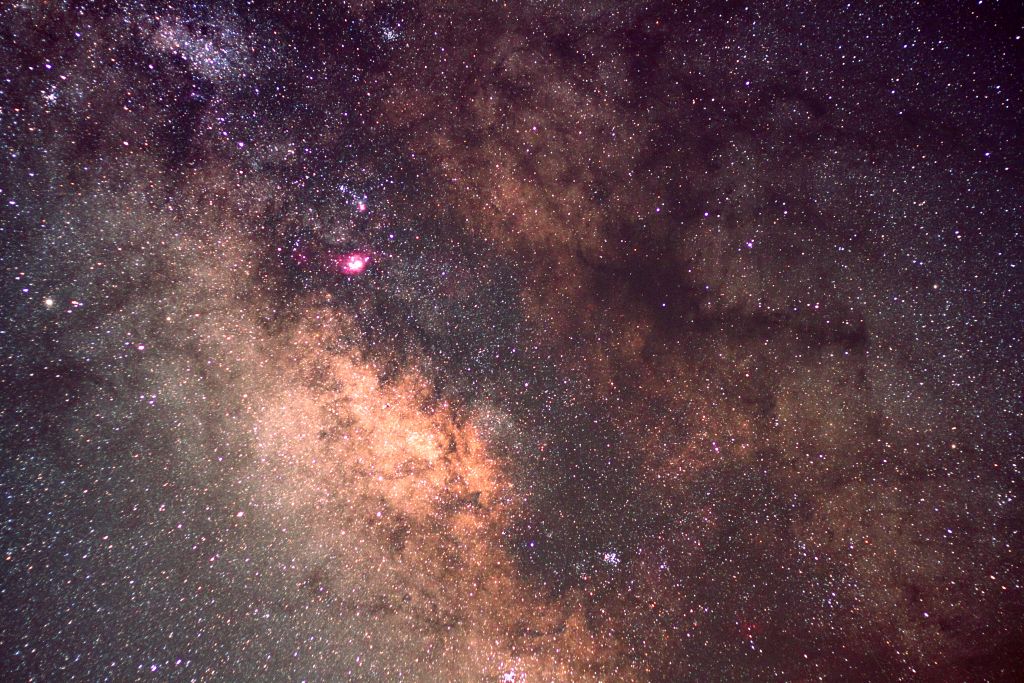
When I purchased my first DSLR, I was bit by the astrophotography bug again after nearly twenty years away from the game. I tried some simple things and I was hooked. More recently I was able to take my Double Arm Drive to a dark sky location. Here is a shot using a 50mm f/2.5 lens at ISO 400 for 2.5 minutes. This is a compressed image but the original shows incredible detail.
LINKS
Astrophotography with a DSLR
http://www.covingtoninnovations.com/dslr/index0.html , http://www.astropix.com/ , http://www.astro.shoregalaxy.com/dslr_astro.htm , http://www.astrophotography-tonight.com/dslr-astrophotography-tutorial/
Books:
http://www.covingtoninnovations.com/dslr/ , http://www.astropix.com/GADC/INTRO.HTM
Single Arm Links
http://www.diyphotography.net/create-wonderful-astrophotography-images-with-a-diy-star-tracker , http://www.proweb.co.uk/~ksgreen/Astronomy/Tracker/index.html , http://www.slscope.co.uk/astro_projects/barn_door/practical/motor_driven_barn_door.html
Double Arm Links
http://www.steveirvine.com/astro/barn_door.html ,http://education.jlab.org/tracker/ ,http://www.astronomyboy.com/barndoor/ , http://vts.bc.ca/astrophoto/drive.htm