“I am still obsessed with the question of the optimum size for home-built binocular telescopes, so my experiments continue.” – Dave Trott
Though I have built several large binoculars and am very happy with many of them I thought that these kinds of instruments could offer wonderful views in 6″ or maybe even 8″ apertures. My experiments in the late 90’s with a 13 inch binocular telescope led me to conclude that the bigger the aperture the more difficult these things were to build and use. See my page on Giant Binoculars for further discussion of this topic.
I am still obsessed with the question of the optimum size for home-built binocular telescopes. So my experiments continue. I have been looking for a binocular telescope that does not cost a fortune, holds alignment under most all circumstances and delivers delicious low-power views. Hopefully it should be easy enough to build so that many other ATM’s can make one for themselves!
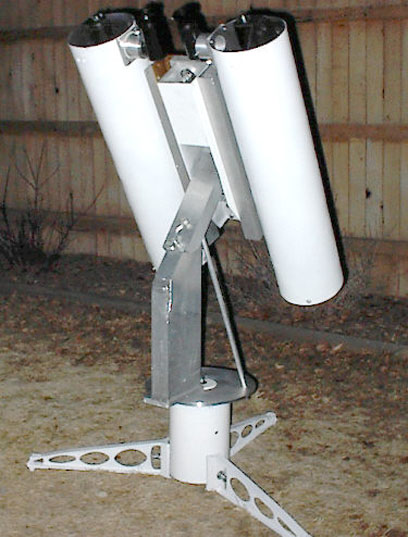
In 2002, JMI introduced a six-inch binocular telescope. I had been saving a pair of 6-inch f/6 closely matched mirrors for several years and the JMI product lit my fire! I decided to use my experience with the 13-inch binos and put all the painful lessons learned in those experiments to work. Everyone knows the well-deserved reputation of JMI for impeccable quality in all of it’s products. I wanted to see if I could “nearly” duplicate the undoubtedly superior performance of the JMI binocular in my garage. This is the result:
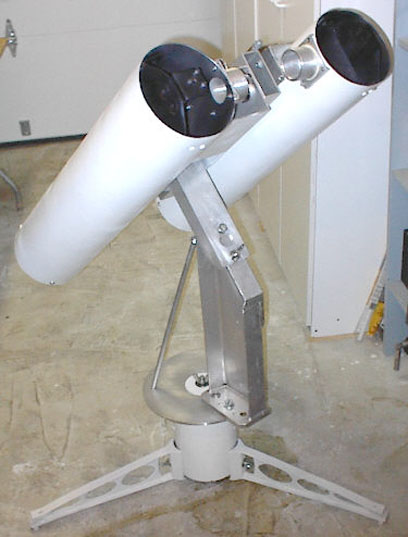
My Six-Inch Binoculars
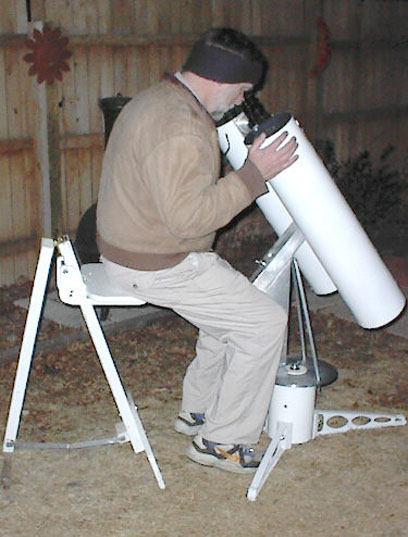
These beauties deliver a wonderful view of the heavens, especially the Moon. They are a pleasure to use. The set-up time is minimal because they are very robust in construction and hold their alignment nearly perfectly. The interpupillary adjustment is simple, intuitive and does not affect the alignment!
I made nearly everything you see except for the mirrors, secondaries, original mirror mounts, secondary holders, ball bearings and the focusers. So, if you have some ATM experience, you may wish to consider building something like this. It’s a doable project if you have built a few scopes and you have modest metal-working skills.
I hope to try some of the JMI binoculars some time, though I cannot afford to buy a pair. It will be interesting to see if mine compare favorably with those beauties. My six-inch binocular telescope is a lot of fun. I operate it at about 44X magnification and the Moon takes your breath away. You seem to see much more with both eyes. It’s not so much that you see more as that you RECOGNIZE more! Your brain realizes that the phenomenon is actually real. Much more validity is automatically bestowed on an image when it is seen with both eyes. When you finally get the adjustments perfect the image “sings sweetly”. You wonder how you could have ever thought you enjoyed monocular telescopes!
Construction Details
I learned many lessons from constructing a 13-inch binocular telescope and many smaller binoculars. To read all the gruesome details see Giant Binocular Telescopes and Big Binoculars. I learned that the best option for binoculars is low power. This minimizes the stringency of the co-colimation requirement. For higher powers a bino-viewer on a larger aperture is most effective and far simpler!
I knew I needed:
- Robust construction to minimize the set-up time every time the scope is used.
- Perfect concentricity when adjusting horizontal and vertical alignment of the two scopes (co-collimation).
- Horizontal and vertical co-colimation must be adjusted at the rear of the assembly to prevent excess eyepiece movement when the adjustments are made.
- Perfect concentricity maintained during interpupillary adjustment.
Solid construction is key
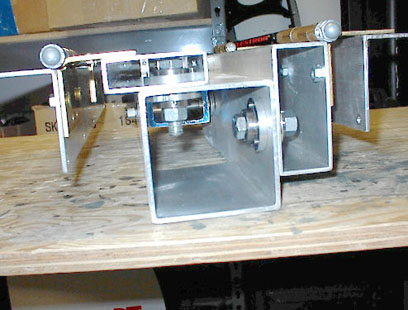
One of the key design features of this instrument is that each of the telescopes is very robust in construction. Each scope was constructed using a metal tube. The mirror cells were beefed up with 1/4-inch 20 adjustment and locking bolts. Each scope was structurally reinforced with aluminum angle running nearly the entire length of the tube. This aluminum angle stock doubles as the mounting platform for the hinges.
Here’s a plan of the cross-section of the instrument:
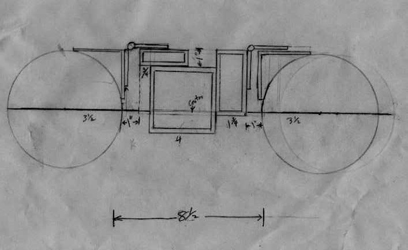
Cross-section view
Sturdy rectangular aluminum stock is used for the center mounting system. I thought long and hard before I decided to use a center mount system and decided that it was worth a try despite the fact that it improves the odds that my old nemesis, gravity, would win a victory of misalignment!

Ball bearings are used for the pivot points for the horizontal and vertical adjustment. I think this a significant and highly desirable attribute of the scope. It maintains perfect positioning of the horizontal and vertical adjustment assembly which is effected with standard push/pull bolts at the rear.
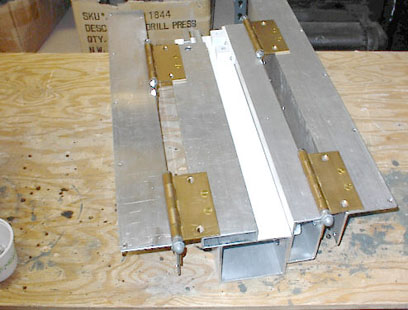
“Wing” layout
With the telescopes attached to the angle aluminum, each “wing” of the system is ready to be mated to the central structure.
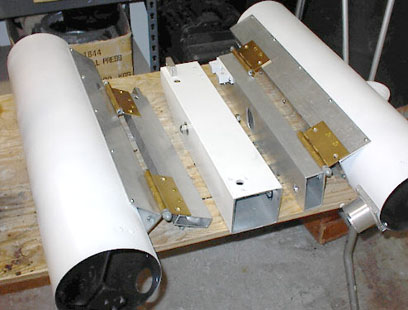
Attaching the telescope tubes
The focusing diagonals come originally from Intez telescopes and used to be supplied with their six-inch Maksutovs. I do not know where you can buy such things. If you know of a commercial product like this please let me know.
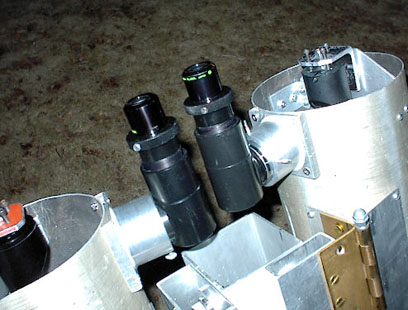
The secondary supports are made of relatively heavy aluminum stock. This makes the entire secondary support more of an optical obstruction but NOT THE SLIGHTEST DROOP IS PERMITTED IN THE SECONDARY! It is VERY important to maintain perfect collimation of each scope independently! Any slight problem there and the entire system is messed up.
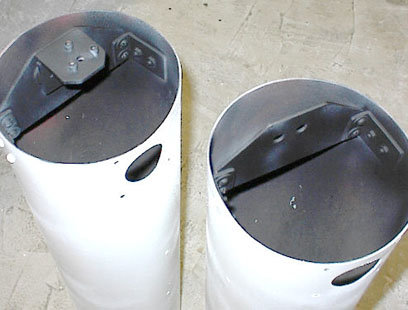
Secondary supports
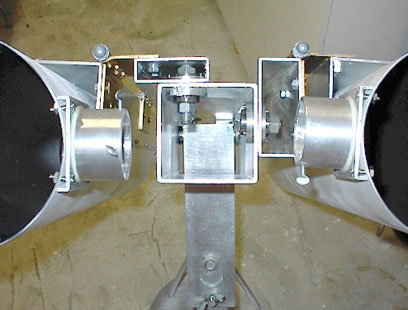
These are the push/pull bolts for vertical (on the left) and horizontal (on the right) adjustments.
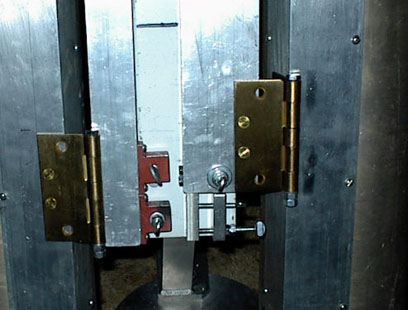
Adjustment hardware & hinges
Each scope is movable for the interpupillary adjustment. With the 13-inch scopes only one tube assembly is movable and that causes a slight “head twist” which is awkward. Comfort is the name of the game with these scopes! After experimenting with some heavy duty door hinges, I learned that they can be made very stiff by replacing the hinge pin with a bolt and tightening the nut to a fairly high torque. The hinges are set at the greatest possible longitudinal separation to maintain parallelism.
The alignment procedure is critical
Alignment Procedures
Aligning this kind of scope is not a trivial process, so you don’t want to do more than a touch-up very frequently. It is time consuming and frustrating. I have done it enough times so that I am beginning to know the fastest and most effective techniques to use.
You start with a very rough field rotation adjustment made by looking carefully at the focusers to make sure they are parallel with the scopes. The scopes will, of course, already be pretty close to perfectly parallel already. Remember, though, the scopes may look a bit off while the optical axis is dead-on parallel. If the adjustment bolts tell you the two scopes are not aligned, do not worry. It’s the optical axis of each scope that counts!
Take the scope outside and have a look. You must select something very distant. By far the easiest time to do this when there is a nice bright moon. A very distant mountain might do as well. Hopefully, there will be a nearly matching image in each scope. If not, it’s trial and error ’till you get something similar in each eyepiece. Do the adjustment for horizontal first. Then adjust ’till the vertical is good. Always do the horizontal first because the eyes will compensate quickly for even a substantial horizontal misalignment.
You will probably see it “snap in” at about this time as the eyes and brain work to make the images merge. But, you’ll probably also feel some “strain”. If you back the images OUT of adjustment in the vertical plane and look carefully at the Moon you will notice that one image may be SLIGHTLY tilted with respect to the other. Check a few of the brighter craters and their relative position. A first quarter moon is easiest because any tilt is a dead giveaway. Then rotate the tertiary mirrors until the images are identical. This will give you a headache. Take a short break and come back to it again in a few minutes. You will probably now have to readjust the horizontal and vertical all over again, though you should be pretty close.
When you are right-on you will know it. The image will “sing” to you sweetly! You will wonder how you could have ever thought you enjoyed looking through one-eyed telescopes!