I am not sure if there is any one perfect, easiest way to do this. If there is, I have not found it. However, it is my experience that if I start from some known first requirements, the process is simpler, though it may still require several iterations. The biggest problem is that there are too many degrees of freedom. The flats can be adjusted to a large number of relative positions all of which deliver a good image. I may have to fiddle with them a lot to avoid my nemesis – vignetting.
TOOLS
Here’s how I adjust the scope:
- I remove the objective. I start at the focuser end of the telescope. I will replace and adjust the primary later.
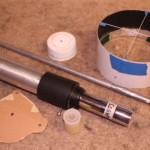
- I remove the first folding flat in its cell and replace it with a cardboard bulls-eye located at the center of the flat. See picture above.
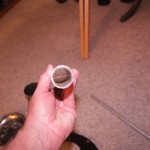
- I adjust the focuser so that it is looking at the second flat. The flat should already be centered pretty well. Throught this entire process I use a sight tube (a long piece of 1.25” plumbing drain-tube with a crosshair in it and a centered peep hole at the eye end – see picture). I may look at the view with and without the sight tube and interchange it back and forth frequently through the entire process. It is also very useful to have a device for covering the second flat. One with a center dot is perfect. I made one out of a plastic cup that I could slip over the flat during this phase. Since the objective is not in place during this phase, there is a nice big hole I can stick my arm through. I reach through and carefully place the cap over the flat. I am careful not to touch the flat during this process. I adjust the focuser so that the center dot is on axis. If it is not perfect I am not too concerned. Since the second folding mirror is a bit oversized, I will not have any problems.
- Now I uncover the second flat. Looking through the focuser, I should see the inside of the telescope tube with a view of my cardboard bulls-eye replacement for the first folding flat. Most likely, it will not be centered. So I use the long handled hex tool to adjust the second flat until the center dot of the bulls-eye is right on line. In my case this has to be quite precise since I do not have much extra size leeway with the first folding flat. It has to be nearly dead on to avoid vignetting. This was a very difficult process until I mounted my first flat “outboard”. Now that I can easily remove it and replace it with my bulls-eye, the process is much easier. The tool I use is a long piece of aluminum tube with an appropriately sized socket duct-taped to the end. (See picture.) The tool is about 18 inches long and takes some getting used to. I reach in and adjust the second flat from the front. It is a bit like collimating a Newtonian, where you have to run from front to back tweaking everything a little each time. It’s a pain in the neck but it is doable. When everything is all on line, I remove the centering bulls-eye and replace the first folding flat in its proper location.
- Now I can adjust the first folding flat to get a good view of the objective from the eyepiece. I mount the objective now, though it could wait until later. At this point I should be able to see all of the objective from the eyepiece if my first flat is well adjusted. Of course, it probably is not, so I may have to make adjustments. This is very easy because the adjusting bolts are right at hand, near the focuser. The tricky part is that it is difficult to tell when the objective is centered. I made a cross-hair to locate the center of the objective out of a simple pair of strings stretched across a closely fitting tube. (See picture) I place that over the objective so I can tell when it is centered. It is not confusing and the image of the cross-hair is clear enough, even through the lens. I am not worried about the tilt of the objective at this time. The most important thing is to line-up on the center of the objective perfectly.
- Now the fun begins. I use my sight tube and try to get the crosshairs to match, with everything lined up. I will probably need to adjust the first folding flat to achieve this. I don’t touch the secondary flat or I might introduce vignetting. From now on any adjustments to the second flat will be very, very slight and only done if absolutely necessary. I want to have the axis of the focuser exactly lined up with the center of the objective. Once I have that accomplished I am done with this step, so all I have to do is adjust everything until this criterion is met.
- But I want to achieve all this with no vignetting. I take a look at the objective through the focuser without the sight tube. If my luck is bad I will see the cross-hairs right on target but I have somehow cut off at least a part of the objective. My task is now to go through all the above steps again until I can see all of the objective from the eyepiece position. So I may have to go through the previous steps repeatedly, but not necessarily in the same order until I have it all lined up. At this point I have, on several occasions, had to take a time out, have a cup of coffee, take a nap, whatever. This can be very frustrating but it is just a matter of time. I have learned to make any adjustments very small and return immediately to getting the objective centered. I don’t worry if the mirrors are not perfectly concentric. They may be slightly off with no bad effects. In my case the second folding mirror is quite over-sized so I have the luxury of tweaking the focuser mount a little. It does not matter if I am not looking at the exact center of any reflecting mirror from the eyepiece. That is just a starting place for the process. The mirrors may not be perfectly placed. No worries, that does not matter in the end. As long as I can see the entire objective and it is centered along my sight tube, my scope will work just fine. If I get lost I go back to the very beginning and start all over. Frustrating, yes, but not the end of the world. Since this thing is fairly robust, I will not have to do this often. Since I have practiced this collimation procedure many times, I now have confidence that I will get the ideal configuration eventually so I just hang in there and keep iterating until it is done.
- After I have the mirrors all lined up and have reduced the vignetting to zero, I can actually collimate the scope. The mirrors are now effectively “invisible” now in terms of the optical alignment. From this step on, the process is exactly like adjusting any refractor. Please see other descriptions of the procedures to collimate a refractor if you are not clear on this one. I remove the cross-hairs and sight tube. Using a small light (a single led is perfect) I want to use the primary objective adjustments to make the three primary reflections in the lenses surfaces all line up. I am placing the optical axis of the objective in exact center of the eyepiece and the two axes are parallel. Once I have it close without the sight tube, I can insert the sight tube to make sure it is perfect. I have found that the f/15 design is very forgiving and the images will be quite good even if I am not quite dead on with the last step. My sight tube is a bit “wobbly” and imperfect and I seem to be able to get it dead on anyway. I can always do a final tweak using a star test but I have not found that to be necessary. I have perfect diffraction rings in the star test.
Once I get this accomplished, I have great images in my scope. I always do a star test to confirm that all is well. Since my scope is very robust in construction, I do not have to do this on any kind of regular basis. Unless I am doing work on it, the scope holds the adjustments perfectly.