“One of the nice features of the ‘clampless-clamp’ system is that you can easily upgrade it later if you are not happy with it’s performance.” - Dave Trott
This 17.5 inch Dobsonian is built mostly according to the recent excellent book The Dobsonian Telescope by Kriege and Berry. But it has two unorthodox and experimental features. The most obvious is the style of the altitude bearings. Not so obvious is the use of “torsional friction clamps”.
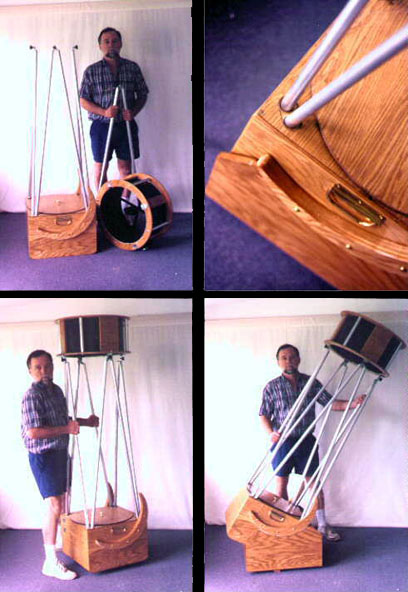
Supporting the weight of the telescope, including optics, with just two of the struts!
Clampless Clamps?
The Seurrier Truss tubes are held in place by friction (as usual), but the friction is induced by the slight inward cant of the tube sockets (note the slight angle in the top left photo above). When the secondary cage is inserted, the truss tubes are pushed outward in their simple sockets. The leverage is substantial because of the long moment arm and the hardwood sockets grip the tubes nicely, as demonstrated in the third picture where I am supporting the telescope (including all optics) with two of the truss tubes. (I do not recommend this as a standard procedure…dropping your telescope with primary even a couple of inches could cost you a mirror!)
The sockets were not terribly difficult to make. I set up an block angled at the (about 20 degrees) tilt from the corner of mirror box to the center of the secondary cage. Then I added an additional slight tilt (about 5 degrees) inward when I drilled each hardwood block. I used a drill press, but I’ll bet you could do as well without one. The collimation time is about the same as with any other system but this system reduces setup and take down time a lot. I don’t know if the “clampless clamps” will work indefinitely or will wear out. Stay tuned to this web site to find out!
If you are building a large Dobsonian, I suggest you use “The Dobsonian Telescope” by Kreige and Berry as your BIBLE . Their advice is the best you’ll get. Remember, anything you do which is in line with their wisdom will be guaranteed problem-free. Anything which goes contrary may give you a headache down the line.
If you decide to experiment with the “clampless-clamp” on your telescope it should be a no-lose proposition because if it doesn’t work to your satisfaction you can easily change it to a standard clamp system later. I used 3/4 plywood on the box and 1″ aluminum tube (not sure of the gauge, but the wall is about .060″ thick.). The top attaches in exactly the fashion described by Kreige and Berry. The “socket holes” are drilled into 3″ cubes of laminated oak boards (laminations run HORIZONTAL for lateral strength)…make these with wood glue and clamps…. make some extras so you can test the performance at various angles.
The socket holes are about 1.25″ deep and were made with a standard 1″ spade bit (careful - this will BITE you BAD if you get a finger too close) in a drill press. The tricky part is getting the angle right. For my telescope the angle had to be canted by about 10 degrees just so the two side struts will meet at the top. (You should figure this out for your own telescope with a simple scale drawing.) But it also has to cant the tubes toward the center of the secondary cage so that when they are in position they are somewhat stressed. As a first try I guessed about 10 degrees for this angle then added about another 5 degrees for friction and it worked fine, but you may need a different angle. You will want to make a jig out of scrap wood to use with your drill press to position the wood blocks for boring. Be sure everything is well clamped!! The jig does not need to be too complicated if your drill press table tilts (as most do). Tilt the table by 10 degrees (depending on your telescope) and then rotate the block in it’s jig another 15 degrees. You have two holes to drill in each block and they require opposite twists. Think about this before you start drilling in your good hardwood blocks. Experiment with some scraps and dry fit things to make sure you are doing it properly. This may require some experimentation. After you drill the sockets you will want to smooth the inside. I used Elmer’s wood filler on my finger and just filled in the porosity on the inside of the sockets. Then I sanded the inside until it was pretty smooth and the fit was just right…so I could slip the struts in without binding and when I got them to final position they were gripped snugly.
You can adjust the depth of the socket with 1″ washers where necessary to make everything fit. I did not have to reinforce the struts with an inserted dowel, but you may have to, especially if you use thinner walled aluminum tubes. Remember you can always remove a bit of material and enlarge the socket holes by sanding which will also adjust the friction….don’t smooth the sockets too much or they will not grip as well. And don’t go too far at any one time because it’s more difficult to add material. Trial and error will get your “clampless clamps ” tuned for best performance.
One of the nice features of the “clampless-clamp” system is that you can easily upgrade it later if you are not happy with it’s performance. Who knows? You might save yourself some time and expense.
Want to build one?
If you decide to build a scope like this, here’s the best advice you’ll get from anybody on this topic: buy and read Kreige and Berry’s “The Dobsonian Telescope”. It is your BIBLE!! You will be very glad you did and you will build a superb telescope.
The 17 inch dobsonian
In addition to the “clampless-clamp” system I deviated from Kriege and Berry in some other respects:
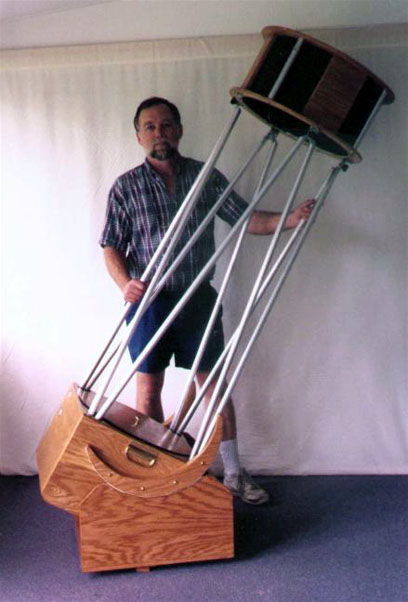
The short rocker box is possible with the slightly radical side bearings…they are a bit bigger than usual (note the “scimitar” shape and extra thickness for strength). My solution seems to work just fine.
The mirror box and cage are somewhat compromised but I have seen much more radical….the trade off is in stability (not to be sneezed at!) in the mirror box. Mine works just fine…no problems…but if you go too far you might see consequences.
The cage assembly suffers from less than optimal light baffling…if I am not in a VERY dark location I get some light leaking into the eyepiece from above the tube unless I use additional baffles on the opposite side of the mirror cage.
The cage size is a question of weight, balance and mechanical strength. I suggest you follow Kriege to the letter. One change I would make to my scope would be to build it such that the cage assembly could nest inside the rocker box….it would be much more compact to pack that way.
These issues are all compromises. You should realize that the design in Kriege’s book is a conservative and “SURE FIRE” solution. It’s fun to push the envelope here and there…but be conscious that something might suffer if you do.
Thanks to all of you who have emailed me with compliments and questions about this scope over the last couple of years. I hope yours are working as well as mine!
Best of luck and Dark Skies!