The Perfect Telescope
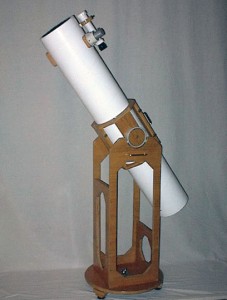
This six inch reflector is very close to the “perfect telescope” in many ways. It is inexpensive, reasonably portable, gives good performance on planets, the moon and deep sky objects and is simple. It is a telescope for the people. Most anyone who wants a telescope can own a telescope like this. The total out of pocket expense could be as little a two hundred dollars if you are careful with your pennies. At most it will cost about twice that. You can buy the optics new for about $150, and that’s the heftiest single expense.
This scope has some nice features. Some of them are not found on commercial scopes costing much more.
- First the design puts the eyepiece at nearly eye-level. In most cases you do not have to kneel on the ground to use it. It is very comfortable to use with an inexpensive observing chair (see my page Backyard Observatory for a description). The base must be a bit bigger to do this effectively, but the mount is still reasonably light and is very stable.
- Second, the cage assembly allows you to twist the scope around for either right-hand or left-hand viewing , move the scope up and down for perfect balance without counterweights (no matter what kind of finder or eyepiece you use) and adjust the scope to make it easier for kids to look through. The cage also serves as an “exo-skeleton” to keep the tube rigid and thus to keep the telescope well collimated and aligned. The telescope uses standard 1.25 inch eyepieces so you can upgrade to higher quality eyepieces anytime you want.
- Nearly all the parts for this telescope come from your hardware store. You can make it and fix it with simple hand tools. The only parts you have to get from a special supplier are the primary and secondary mirror. Even the eyepiece and finder optics come from your local discount store!! The focusser and finder scope are made from plumbing fixtures.
- This scope is user-friendly and does not involve complicated computers to operate. It puts you in direct contact with the stars rather than forcing you to interact with a hand-held “interface”. (Of course, this means you have to know a little about the sky to operate this telescope, doesn’t it? Don’t worry, it’s not that hard. And it’s far more rewarding to locate things in the sky using your own on-board brain.)
YOU CAN BUILD THIS TELESCOPE
This is a six inch Dobsonian reflector. Many ordinary people have built simple telescopes like this. See my website (davetrott.com) for pictures of a few of them. Before you decide to take on such a task you should read everything you can about the project. I am working on a web-book that will help and there are many other web pages to check out. I’d highly recommend that you read the books Build Your Own Telescope by Richard Berry and Making and Enjoying Telescopes by Miller and Wilson. You should also know that you can buy a telescope much like this for about $400 or $500. If you are interested in building any kind of telescope, I suggest you take a look at the rest of this page. Even if you don’t build this particular telescope you might find some helpful and money-saving ideas you can use.
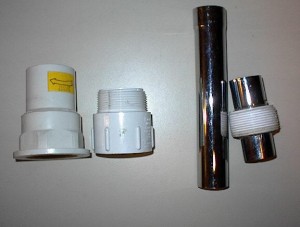
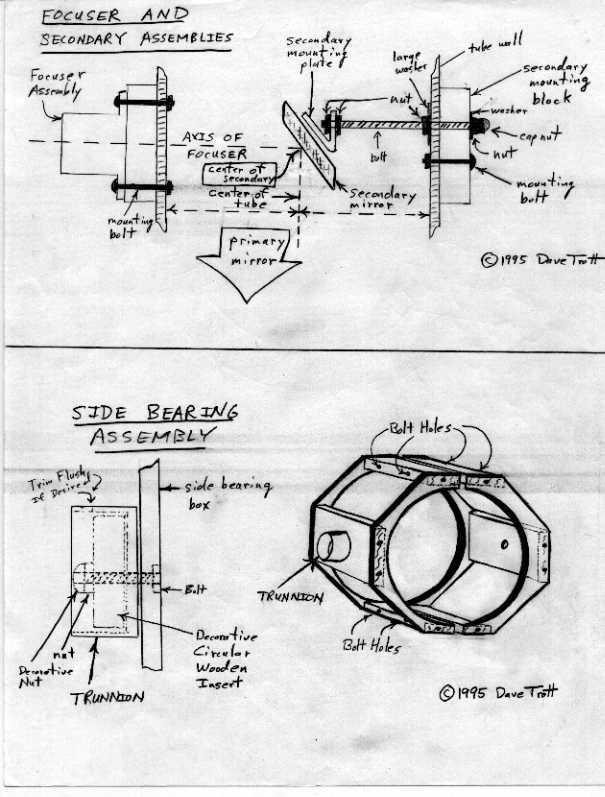
FOCUSER
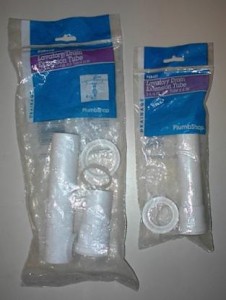
The focuser for this telescope is a simple helical focuser. It works well and costs very little to build. All you have to do is find some plumbing fittings like these on the left. These PVC fittings are designed to screw together. NOTE: make sure they screw together freely with no binding. The smaller, inner fitting must be large enough to accommodate the 1 1/4″ brass drain extension. Use some masking tape to fit the 1 1/4″ fit snugly inside it. Cut the PVC fittings so that the only remaining part of the inner section is its threads. The larger fitting must be cut so that the smaller fitting will go into it from the direction opposite that intended by its design. Mount the assembly on a curved piece of hardwood with a nice big hole in the middle. In the left picture the inner section of the completed focuser is pictured for clarity. The 1 1/4″ ID section of the brass tube must be accessible from the outside since that is the standard size for good eyepieces. You might want to cut a couple of slits in it as shown so that it will grip an eyepiece.

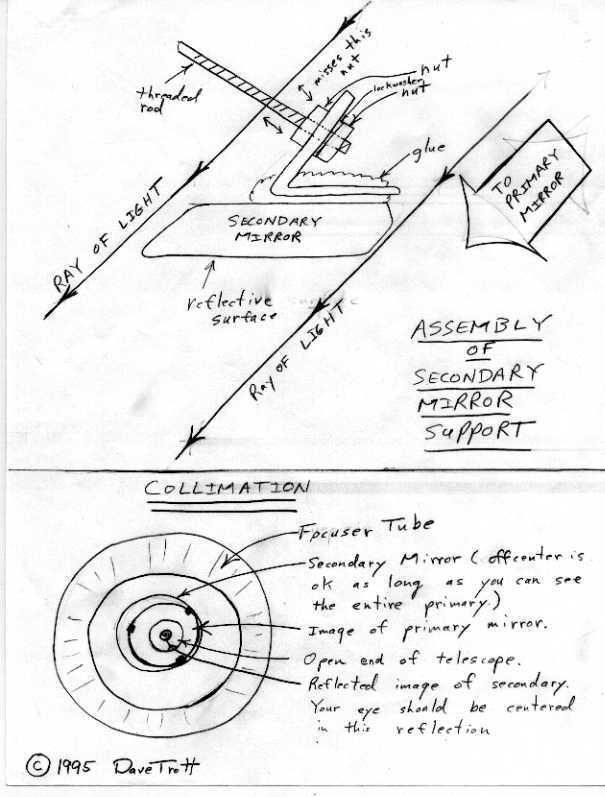
SECONDARY MIRROR SUPPORT
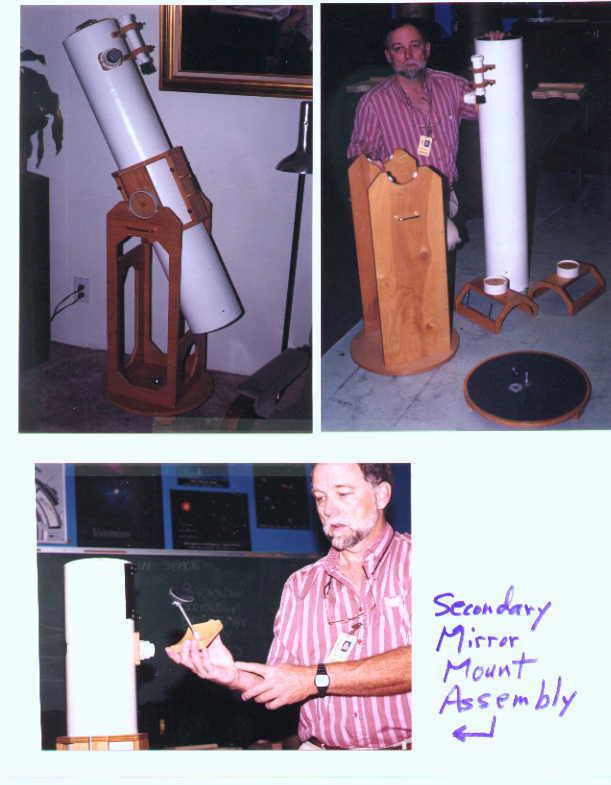
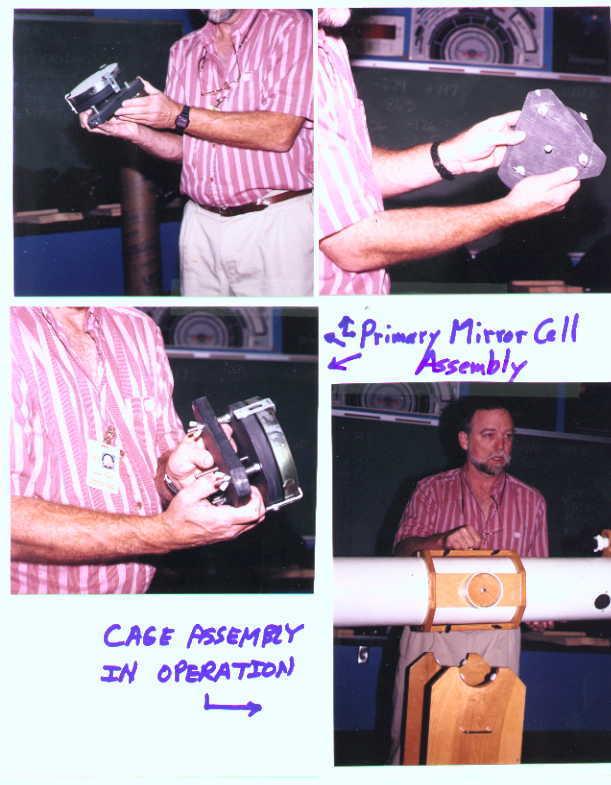
Second mirror mount assembly
The secondary mirror mount is unusual. Many scopes use a fairly complicated device called a spider, with four vanes that attach to the tube in four places and support a special device called a secondary mirror holder. This is a fine system. But it’s complicated to build and expensive to buy (about $50). The system I used is not new. I copied it from some very old books and updated it slightly. It is simple, robust and effective. It is a bit more difficult to adjust, but once properly adjusted should hold the adjustment indefinitely. Telescope-maker purists will object to the thick 1/4 inch single support bolt. But it really does not introduce very much diffraction and is a useful compromise for a first telescope. The thickness of the bolt makes it very strong and steady; no vibrations in this secondary!
I recommend a slightly oversized secondary mirror for this telescope. Use a 1 1/2″ secondary if this is your first telescope. The extra large secondary mirror will allow for less-than perfect construction.
To attach the secondary mirror: Buy a small tube of silicone glue and attach your secondary mirror to a 45 degree angle piece of steel drilled to accept a 1/4′ bolt. (Make this by bending an ordinary steel corner-brace to 45 degrees). Attach by placing the secondary face down on several layers of Kleenex and laying a thick bead of silicon glue on the back of the mirror. Be sure to get the placement right, with the proper amount of overhang. (See the diagram in the plans below.) Be careful not to touch the front mirror surface.
To assure yourself that the mirror will always stay attached, give this assembly the “shake test” after it cures over night. Attach it to a long bolt, place your entire hand and the secondary assembly inside a plastic trash bag and shake the assembly violently. Try not to allow the mirror surface to touch anything during this test. If the mirror comes off now it won’t be a major disaster. It would be very unfortunate if that were to happen later after it is installed in the telescope, when the primary mirror is in place.
CAGE ASSEMBLY
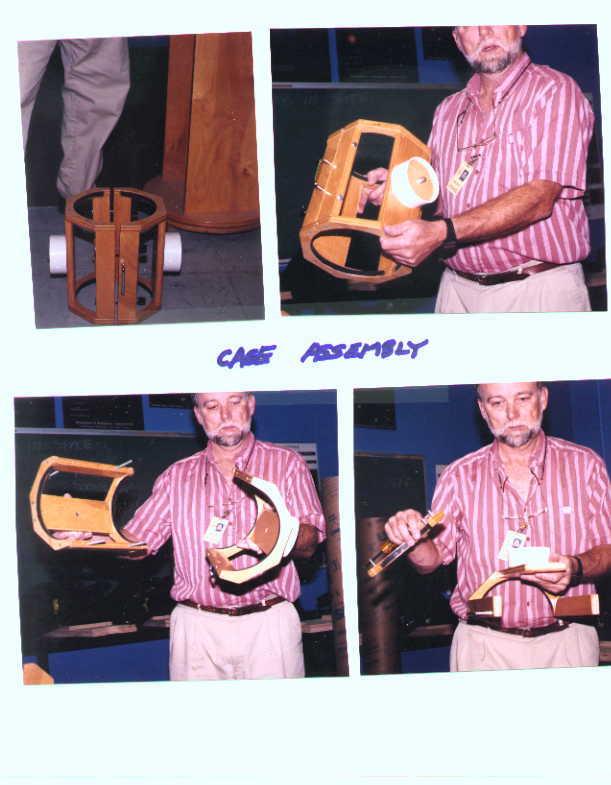
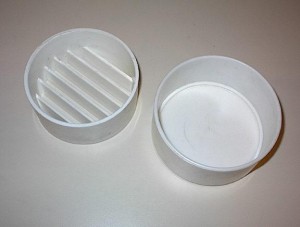
The cage assembly is actually two separate pieces which are held together by four long pieces of threaded rod. They must be made so that they compress the tube between them. This is what holds them in place. The side bearings are made of four-inch PVC drains. The picture on the bottom right shows one of the pieces dismantled. The curved pieces must be covered with felt so they don’t scratch the tube. Inexpensive sheets of self adhesive felt are available in the “chair-foot-pad” section of your hardware store.
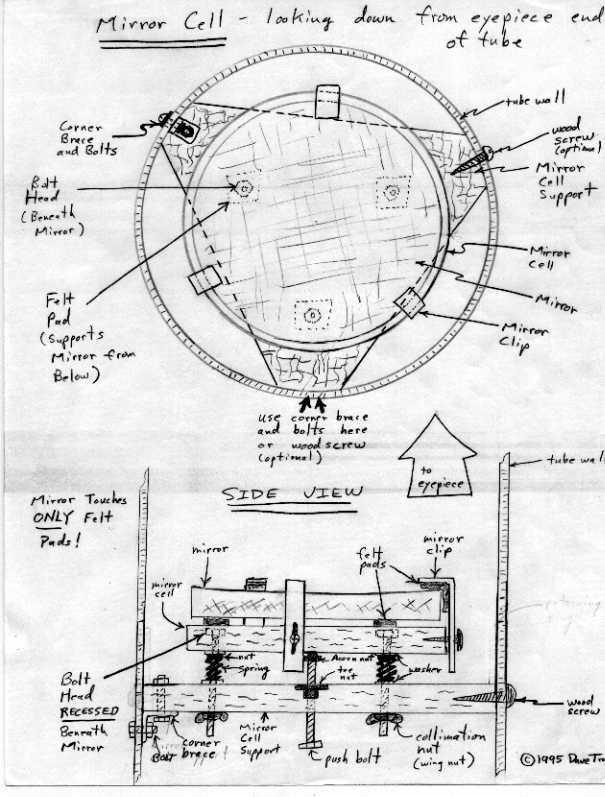
PRIMARY MIRROR CELL
The mirror cell is very simple. It’s made of a couple of pieces of plywood. The mirror is held to the top piece by three mirror clips made of angle braces from the hardware store straightened in a vice and re-bent at the proper distance. The mirror is held in place with self adhesive felt pads at every contact point. The mirror must be cradled with no excessive pressure. The top piece of plywood has three long bolts protruding from it. These three bolts pass through springs and through the rear, triangular plywood section. Wing nuts pull on these bolts allowing the adjustment of the tilt of the forward plywood disk and thus the mirror. This is necessary for the adjustment of the telescope. See the plans for more detail.
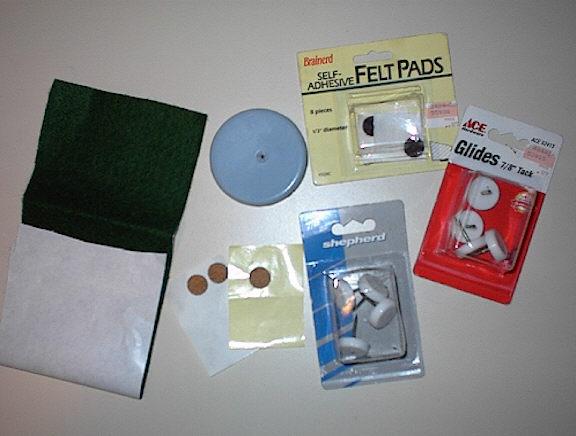
Some of the parts needed to build this telescope.
THE FINDER
 Before you make a decision to build your finder according to these instructions think about this: You can buy a Telrad finder (pictured) and inexpensive commercial eyepiece for about $80 total. This option is much easier than dissecting a cheap pair of binoculars to build your own finder and eyepiece. Though the finder you build will work fine, the Telrad is the best finder for any telescope. It is very simple and easy to use. The build-it-yourself option will cost about $35 total. And the Telrad finder (pictured at left) is far superior to the finder you will build and is the recommended finder for ALL telescopes of any price. If I were building this scope as my first scope, I’d opt to spend a bit more and get the Telrad.
 The finder for this telescope is made of the front lens element of a cheap pair of 7×35 binoculars. Get hold of an inexpensive or broken pair of binoculars. They must be 35mm to use this design, though with some ingenuity you could adapt it to any size. You can buy a pair of binoculars from a discount store for $20.00 ( look for the kind with a “Z” shape to each barrel - these are prism style binoculars. Do not buy one in this price that is composed of two straight tubes - these are Galillean or “Opera Glasses” and are a rip-off and won’t work.). Never destroy a pair of good quality Zeiss, Leica, Swarovski or other name-brand binoculars for this purpose. The expensive ones are worth fixing! Remove one of the primary lenses. Sometimes these will simply unscrew but often you will have to cut away the plastic housing with a hack saw.
Usually, even the cheapest binoculars sold to adults contain two useful eyepieces. A binocular eyepiece will have a fairly long focal length (usually 25mm or so) which will give you low power in your telescope.(LOW power is a desirable trait, believe it or not!). You can use one in your finder and one in the main telescope.
First, use whatever skills you have to remove the eyepiece from the binoculars without doing the glass portion any harm. Often you can just cut the supporting aluminum arm with a hack saw. File any sharp edges, being careful not to get any shavings into or onto the eyepiece. Buy some 1.25″ OD drain tube at your hardware store. You should be able to wrap masking tape around your eyepiece until it fits snugly into a short section of this tube. If not you will have to use some ingenuity to make the eyepiece slide into a 1.25″ tube and be removable. If you can do this you have two inexpensive 1.25″ telescope eyepieces, one for your finder and one for the main telescope. Of course, you’ll be lucky to find one that slips into your star diagonal. If it doesn’t fit you’ll have to use some tape and/or plumbing fixtures and/or ingenuity to fit your eyepiece to the star diagonal. Find a simple way to fit the eyepiece using some tape or whatever.
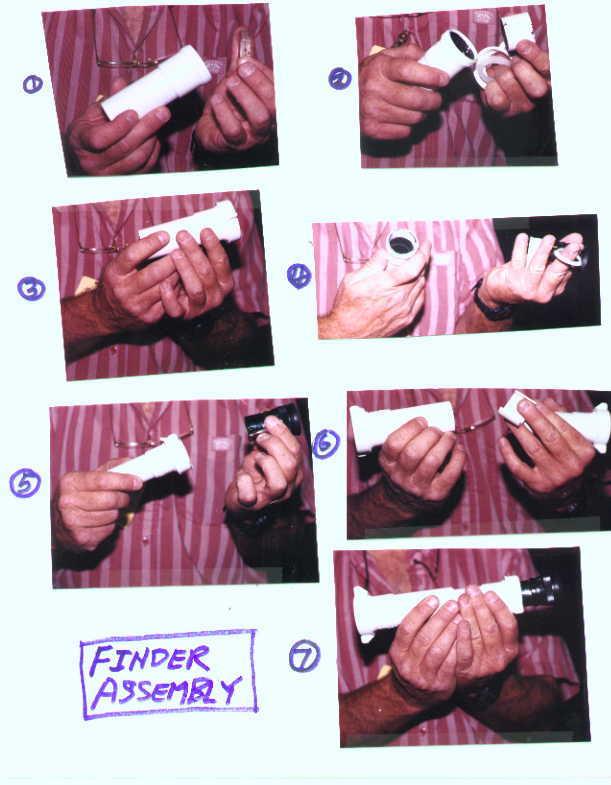
Once you have a 35mm binocular objective, get a 1.5″ plastic drain tube extension and a 1.25″ plastic drain tube extension. The 35mm lens should slide into the 1.5 inch adapter and stop where it narrows. You can cut a short piece of the tube off and use it as a spacer to hold the lens in place using the included friction nut. Then with one of your eyepieces installed in the 1.25 “adapter you should be able to slide the small diameter 1.25″ tube into the small diameter 1.5″ tube until the mini-telescope forms an image of a distant object. Be patient , this will take some experimentation. You will probably have to cut one or both of the tubes shorter to make the telescope focus. Try it with the eyepiece and the 1.5” tube by themselves That will give you some idea of the proper distance. Use some masking tape or scrap plastic tube as a bushing to make the tubes fit snugly. DO NOT GLUE THEM TOGETHER. You need to be able to slide them back and forth for focus. The finder rings are made of 3/4 inch solid hardwood, cut to shape, drilled and tapped for the adjusting bolts. If you are obsessive paint the inside flat black.
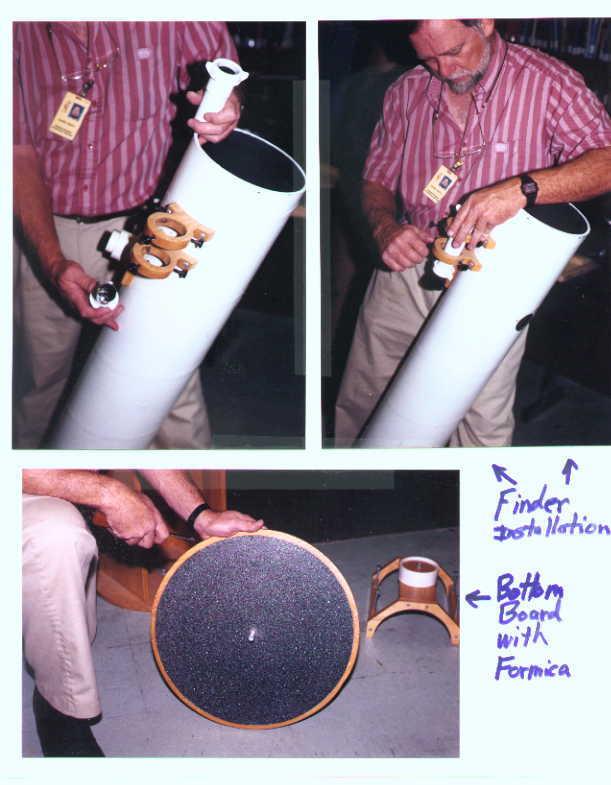
The ground board and the base board must have teflon in contact with Formica or some other brand of plastic laminate. Rough surface Formica works best. Get some teflon pads at the hardware store in the chair leg section. The ground board is the one closest to the ground. It will have some stubby feet at three points where it contacts the ground.
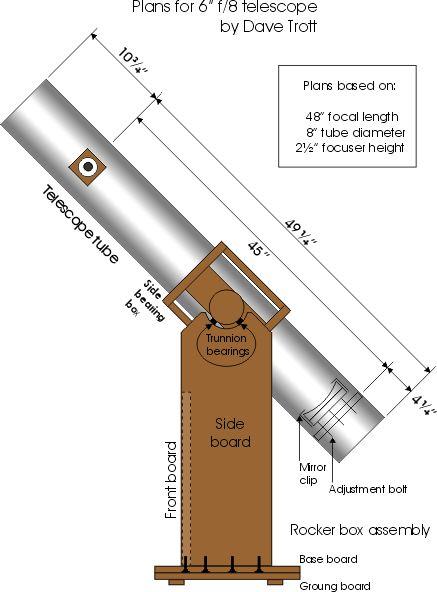
THE PLANS
If you are interested in building this telescope, check these next pages carefully.
RECOMMENDED PROCEDURES
- READ AND FOLLOW ALL SAFETY PRECAUTIONS WHEN USING POWER TOOLS!!!
- Always wear safety goggles.
- Wear a good dust mask when sanding.
- MEASURE TWICE, CUT ONCE: Double check every measurement before you drill or cut.
- Use 3/4 inch plywood. A nice appearance can be obtained with better wood. The best looking finish on the wood will be achieved with lots of sanding. When sanding large surfaces, always sand with the grain. Start with the coarse grades and proceed stepwise to the finest grades. Most of the sanding should be done BEFORE assembly. For the tube; sand lightly with a fine grade sandpaper before painting. The tube is 8″ cardboard concrete forming tube commonly called “Sonotube”. Don’t worry , IT IS strong enough. Paint it with good water/resistant paint; black on the inside. Before you paint it, peel the thin plastic “skin” off of the interior of the tube. Start at a corner and gently lift. It should come off in one piece if you are careful. Paint the tube interior flat black. Use a brush attached with duct tape (at about a 45 degree angle) to a two foot stick. Or use a spray but don’t breathe the vapors! Or make up your own, creative technique for painting the interior.
- Pre-drill all screw holes to prevent cracking. Countersink them for aesthetics (if desired).
- Use screws for attaching wood to wood. Test your telescope thoroughly for a few months before gluing. Most people find that gluing the wooden pieces together is unnecessary.
- Use wood filler to fill any cracks or chips then sand the patches smooth.
- Water-based polyurethane products varnish will allow you to work fast and produce a beautiful finish on wood surfaces. Sand and stain first, of course. I suggest a light coat of stain followed by two to four coats of gloss (or satin) polyurethane. Using a very fine (400 grit) sandpaper between coats will give a super smooth appearance.
- If you match your trim pieces (knobs, handles, bolts, etc.) in brass they will add a classy touch to your telescope.
- Put a dot on your primary mirror. Place the mirror face down on a sheet of paper and trace around it. Cut out the circle and fold it in half. Turn the paper 90 degrees and fold it again. Cut 1/8 inch off the tip of the corner at the center of the circle. The result should be a circle you can lay GENTLY over the surface of the mirror which covers it completely and has a small hole dead center. When you are SURE you have located exact center, place a small, 1/4″ circular dot of white paint directly on the surface of the mirror. Remember, it must be DEAD CENTER!!! (THIS WILL NOT AFFECT THE PERFORMANCE OF YOUR TELESCOPE IN THE SLIGHTEST!! It will be used later for precise collimation adjustment.)
- (OPTIONAL) You may find it desirable to remove some of the material from the side boards and/or the front board in order to lighten the mount a bit (as I did). This is not necessary. You can leave the side-boards solid. But if you find the mount a bit heavy, it’s an opportunity to become creative with your jigsaw. If you do cut out any material, be sure to leave plenty of wood near any attachment or support points. Mine is a bit extreme. Be more conservative than I was. Don’t remove as much wood as I did.
- Paint the mirror cell and mirror cell support flat black.
- When you cut the holes for the focuser and secondary mirror assembly: carefully check the plans for placement of the holes. Cut a 1-3/4″ to 2″ diameter hole and an identical one opposite it on the tube. This can be done with a hole saw, if you have one. If not, you can drill several holes in a circular pattern and remove the remaining material with a sharp knife. Don’t worry about the appearance of the holes since they will be covered on the exterior of the tube by a wooden mounting block.
- On the dimensions for your telescope: The philosophy to adopt here is to build from the inside out. The dimension of the side bearing box and the cradle box depend on the diameter of the tube you purchase. Let’s assume your tube is exactly 8 inches outside diameter (measure this!!!). If you look at the diagram of the trunion box, you’ll see that it has to enclose and grip the tube. So the trunion box has to be the diameter of the tube plus about 1/4 inch plus the thickness of your plywood (times two). Assuming your tube is 8″ and your plywood is 3/4″ (measure this!!!) that would give you an outside width of 9-3/4″. The Rocker box inner width should be this dimension plus about 1/2″…. giving you 11-3/4″ for the outside width. The large circular pieces should be about 18″ in diameter. The height of the side bearing box should be about 32″. This will give you a nice position for the telescope. If you don’t like it that high, it’s easy to make it shorter later on. Loosely assemble the entire rocker box assembly (using the nice piece of round wood for your base board) and outline the positions of the side and front boards in pencil on the top of the base board. Then drill nine holes within these lines. The screws to attach the side boards and front board will come back UP from underneath to attach these pieces to the base board. When everything is properly fitted, assemble the rocker box.
- Test fit the curved sections of the side-bearing box to the telescope tube. They should be a bit loose and slip around the tube easily. If they aren’t, you will have to remove material and sand them until they are. Later you will attach felt to these curved sections. They must be fairly snug when the felt is attached. Referring to the plans and diagrams, assemble the side-bearing box.
- When you mount the secondary mirror assembly, be sure the center of the secondary mirror is lined-up with the axis of the focuser (see plans). Make sure the length of the threaded rod puts the secondary mirror in the center of the tube (within 1/4 inch)
- When you assemble the primary mirror cell and support, look at the diagrams for locations of bolts and felt pads. Mount the primary mirror in its mirror cell and then in the tube. The location of the primary mirror cell support is approximate and will work with most mirrors. If your primary is exactly 48″ in focal length, then the distance from the center of the focuser hole to the center of the mirror cell support should be 45″, as on the diagram. There are two options for attaching the mirror cell support: A. Put a screw through the tube wall into the mirror cell support 45″ (triple-check this measurement!!) behind the center of the focuser hole, as shown in the right side on the mirror cell diagrams. OR, B. (RECOMMENDED) You can obtain three corner braces one to two inches long and attach them to the mirror cell support with bolts as shown in the left side of the mirror cell diagram. Then when you insert the mirror cell into the tube it will be easier to attach it to the tube with bolts from the outside. Using this option will require you to ADD THE HEIGHT OF THE HOLE IN THE CORNER BRACE PLUS 1/4″ to the 45 inch measurement (triple-check these measurements!!!). Make sure the center of the mirror-cell support ends-up at 45 inches (for an f/8 system) behind the center of the focuser hole. If you drill holes in the wrong location for any reason, simply buy some pretty dummy bolts for the unused holes. You can call these additional features on your telescope “Conductive Cooling Bolts” (To help the telescope reach the proper temperature.) You are not lying either!!!
FINAL ASSEMBLY AND ADJUSTING THE OPTICS
After the focuser is mounted but before you drill any holes for the secondary mirror assembly you have to adjust and mount the secondary mirror assembly. Here’s what is needed: the secondary mirror MUST looks directly at the center of the primary mirror (where there is a dot, remember?). This is such a confusing view when the primary mirror is in place that I recommend you perform this adjustment before you mount the primary mirror cell assembly in the tube.
Cut a couple of 12″ lengths of string and tape them to the back end of the telescope such that they form a “cross hair ” which is perfectly centered in the telescope tube. Then go to the focuser and look down the tube. Make a long 1 1/4″ empty tube out of some cardboard or plumbing pipe. Make sure it has no sharp edges near the eye end of it. Put it into the focuser. Back away from the focuser KEEPING YOUR EYE DEAD CENTER on the optical axis of the focuser so that you see all the interior of your long tube equally all the way around.
Next, you must adjust the secondary mirror so that it is nearly centered in your view AND it reflects the “cross hair” dead center in your view. You may have to slide the secondary assembly forward or back and /or shim it (or bend the threaded rod a bit) so that when it is finally mounted the cross-hair is perfectly centered when your eye is perfectly centered on the optical axis of the focuser. Don’t worry if the secondary is not, itself, perfectly centered as long as it’s close to center. There is a little extra flexibility because your secondary is oversized. But the cross-hair must be DEAD-ON. When you finish this step, take your long collimation tube out, put your eye up to the focuser and check to see that you can see the entire opening at the back of the tube. If not you’ll have to adjust the POSITION of the secondary, then go through the process of adjusting the aim of the secondary again from scratch. Only when this is perfect should you drill holes and mount the secondary assembly. Tighten the nuts securely and re-check everything.
When you have the secondary mounted and are SURE it’s perfectly lined up on the “cross-hairs” remove the strings and install the primary mirror assembly. Next you will collimate your primary mirror using the three bolts at the rear of the telescope.
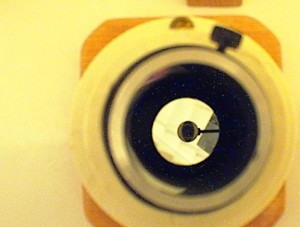
PRIMARY MIRROR COLLIMATION STEPS
- Look into your focuser (with no eyepiece in it). You should be able to see the secondary mirror and, in it, a reflection of the primary mirror with it’s central dot. If you do move to Step 3.
 If you don’t see the primary mirror then you’ll have to adjust the secondary mirror until you do.
With the tube in a horizontal position (so you don’t break the primary should you accidently drop the secondary) perform whatever adjustments are necessary until the primary is reflected in the secondary. You may have to GO BACK SEVERAL PARAGRAPHS TO THE- Make sure the central dot on the primary is in the center of your eyepiece tube. Back your head away from the focuser keeping your eye on axis by making sure the eyepiece tube is perfectly concentric. (Don’t worry if the secondary mirror is a bit off-center. The only important factor on that issue is that the eyepiece be able to “see” the entire primary.) If the center dot on the primary is not perfectly centered in the eyepiece tube you must adjust the secondary mounting so that it is. You may have to SLIGHTLY adjust the secondary. Do this CAREFULLY! It may take several tries before you get it perfect.
- This is fairly easy and may have to be done frequently even on a well constructed telescope. (See the illustration in the plans section for clarification as well as this photo.) Look to see that the reflection of your eye in the primary is dead center on top of the central dot on the primary. For precision you should use a collimating tool (a 35mm film container with it’s bottom cut out and a 1/8” hole in the center of it’s lid works fine) to make sure your eye is centered in the focuser tube. Use the tool only after you make sure you are “close” without it, otherwise you lose the center dot before you get started. It is easiest if you have a friend adjust the three primary adjustment nuts or bolts (after loosening any “locking” bolts) while you watch through the eyepiece until the center dot is right in the middle of the reflection of your pupil.
- STAR TEST: This is the acid test of telescope performance. Center a medium bright star (Polaris is perfect) in your medium power eyepiece. Then move the focus in and out past perfect focus. On either side of focus you should see identical systems of little concentric rings around the star (perhaps 3 or up to 15). If they wobble around, that’s just the atmosphere, don’t worry..If they are identical and circular you have a perfectly adjusted scope. If not you may have to make more refined adjustments. It is also possible that this STAR TEST will show bad optics. This test is so sensitive that to pass it requires that your mirror be exactly the same temperature as the air! It may require you to put the telescope outside for half an hour before even attempting the STAR TEST. If your telescope seems to fail the STAR TEST do not panic. See if you can get an expert (a member of your local astronomy club, perhaps) to look at it. If your telescope passes the test BE HAPPY!!
SPECIAL NOTE: Telescope mirrors sometimes have slightly different focal lengths. THIS IS A NORMAL VARIATION and should not cause you any serious problem or concern. You may have to adjust the position of the primary mirror assembly at a later time. You will recognize this situation if your completed and assembled telescope will not focus on a star. This telescope design is intentionally VERY FLEXIBLE and allows such adjustments to be made easily. If you do have to move the mirror cell support, simply use three dummy bolts in the old holes (to preserve the aesthetics of the tube), drill new holes further back or forward of the old holes. The amount that you need to move the cell can be estimated by test focusing your telescope. You will be able to tell if your mirror is “short” or “long” and by how much. You will probably not have to make this adjustment.
EYEPIECES
You will want some additional eyepieces to give you higher power. I suggest a set of three eyepieces for beginners. A 20mm to 32mm, a 10mm to 15mm and a 4mm to 7mm. To learn more about eyepieces, see The Backyard Astronomer’s Guide by Dickenson and Dyer or Starware by Harrington. With 1 1/4″ eyepieces you get what you pay for.
You may also download the PDF version (843k) 0f these instructions